If you’ve spent any time troubleshooting a network, you’ve probably typed “how to convert IPv4 to IPv6 manually” into a search bar and landed on pages that gloss over the real mechanics. Here’s the truth most articles skip:
IPv4 and IPv6 are not two versions of the same numbering system that you can mathematically convert between. They are separate addressing schemes built on different bit lengths, 32-bit versus 128-bit, so there is no universal formula that turns one into the other, the way you’d convert miles to kilometers.
What actually happens, in real networking environments, is address mapping. Engineers embed an IPv4 address inside an IPv6 structure using standardized formats defined by the Internet Engineering Task Force (IETF). This guide walks through exactly how that mapping works, manually, step by step, using the binary and hexadecimal conversion skills that sit underneath it.
By the end, you’ll understand the IPv4-mapped IPv6 address format, the IPv4-compatible address format, 6to4 addressing, and how to perform every conversion step by hand, no calculator dependency, no guesswork.
Why “Converting” IPv4 to IPv6 Is a Misleading Phrase
Before diving into steps, it’s worth correcting the premise, because this is where most confusion starts.
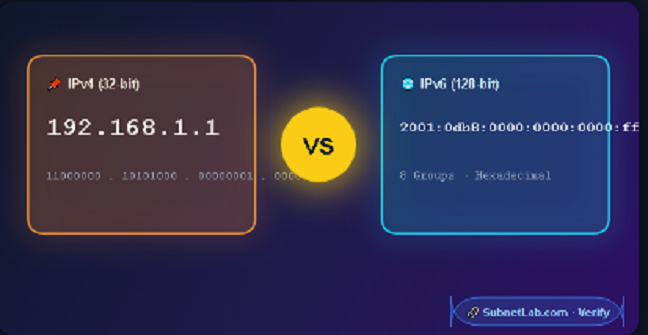
IPv4 uses 32 bits, written as four decimal octets separated by dots (like 192.168.1.1). IPv6, designed by the IETF to solve IPv4 address exhaustion, uses 128 bits, written as eight groups of hexadecimal digits separated by colons (like 2001:0db8:0000:0000:0000:ff00:0042:8329).
Because 128 bits can represent vastly more values than 32 bits, there’s no reversible one-to-one formula linking every IPv4 address to a corresponding IPv6 address.
As an alternative, network engineers use transition mechanisms and standardized methods that let IPv4 and IPv6 systems coexist and communicate during the long migration period. The three most relevant for “manual conversion” are the following:
| Mechanism | Purpose | Defined By |
| IPv4-Mapped IPv6 Address | Represents an IPv4 address inside IPv6 notation for dual-stack systems | RFC 4291 |
| IPv4-Compatible IPv6 Address | Legacy format for automatic tunneling (now deprecated) | RFC 4291 (deprecated) |
| 6to4 Addressing | Embeds IPv4 into a public IPv6 prefix for tunneling across IPv4 networks | RFC 3056 |
Understanding which mechanism you actually need is the first real step and it’s the one most guides skip entirely.
Method 1: Creating an IPv4-Mapped IPv6 Address (Manual Steps)
This is the format you’ll use most often, especially when working with dual-stack networks, socket programming, or NAT64 translation. The structure looks like this:
::ffff:192.168.1.1
or, in fully expanded hexadecimal form:
0000:0000:0000:0000:0000:ffff:c0a8:0101
Here’s how to build it manually.
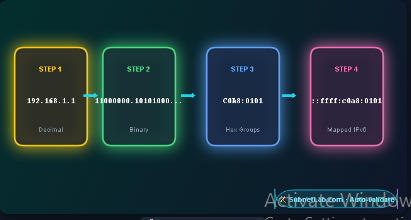
Step 1: Write Out the IPv4 Address
Start with any standard IPv4 address. For this example, we’ll use:
192.168.1.1
Step 2: Convert Each Octet to Binary
Break the address into its four octets and convert each to an 8-bit binary number.
| Octet | Decimal | Binary |
| 1st | 192 | 11000000 |
| 2nd | 168 | 10101000 |
| 3rd | 1 | 00000001 |
| 4th | 1 | 00000001 |
Step 3: Convert Binary to Hexadecimal
Group each 8-bit binary octet into two 4-bit nibbles, then convert each nibble to a single hexadecimal digit.
| Octet | Binary | Hex |
| 192 | 1100 0000 | C0 |
| 168 | 1010 1000 | A8 |
| 1 | 0000 0001 | 01 |
| 1 | 0000 0001 | 01 |
Combining these gives you: C0A8:0101
Step 4: Insert the IPv4-Mapped Prefix
The IETF standard requires that an IPv4-mapped address begin with 80 bits of zeros, followed by 16 bits of all ones (ffff), followed by the 32-bit IPv4 address in hex.
That structure looks like this:
0000:0000:0000:0000:0000:ffff:[IPv4-in-hex]
Slot in your converted value:
0000:0000:0000:0000:0000:ffff:c0a8:0101
Step 5: Apply IPv6 Compression Rules
IPv6 allows zero compression — consecutive groups of zeros can be collapsed into a double colon (::), but only once per address. Applying that rule:
::ffff:c0a8:0101
Many systems also display the final 32 bits in dotted-decimal notation for readability, giving you the more familiar:
::ffff:192.168.1.1
That’s your fully mapped IPv6 address, built entirely by hand.
Method 2: Manual Binary-to-Hex Conversion Reference
Since every mapping method depends on accurate binary-hexadecimal conversion, here’s a quick reference table for converting any decimal octet (0–255) without a calculator. Memorizing this pattern speeds up manual work significantly.
| Decimal | Binary | Hex |
| 0 | 00000000 | 00 |
| 16 | 00010000 | 10 |
| 32 | 00100000 | 20 |
| 64 | 01000000 | 40 |
| 128 | 10000000 | 80 |
| 192 | 11000000 | C0 |
| 224 | 11100000 | E0 |
| 255 | 11111111 | FF |
Tip: Since each hex digit represents exactly 4 bits, you only ever need to memorize the 16 possible 4-bit patterns (0000 through 1111, mapping to 0 through F) to convert any byte instantly.
Method 3: 6to4 Address Mapping (For Tunneling Scenarios)
If your goal is manual IPv4-to-IPv6 tunneling rather than simple representation, you’ll use the 6to4 prefix defined in RFC 3056. This method is common in legacy transition mechanisms where an IPv6 network needs to traverse an IPv4-only backbone.
Step 1: Start With the Reserved 6to4 Prefix
2002::/16
Step 2: Convert the IPv4 Address to Hex (as shown above)
Using 192.168.1.1 again: C0A8:0101
Step 3: Insert It Directly After the Prefix
2002:c0a8:0101::/48
This embedded structure allows routers to extract the original IPv4 address directly from the IPv6 prefix a key feature of automatic tunneling.
Comparing the Three Manual Mapping Methods
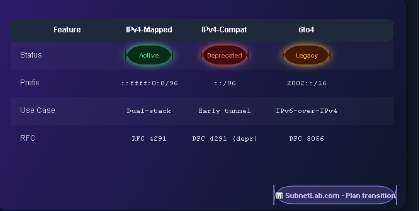
| Feature | IPv4-Mapped | IPv4-Compatible | 6to4 |
| Status | Active, widely used | Deprecated | Legacy, largely phased out |
| Common Use Case | Dual-stack sockets, NAT64 | Early automatic tunneling | IPv6-over-IPv4 tunneling |
| Prefix Used | ::ffff:0:0/96 | ::/96 | 2002::/16 |
| RFC Reference | RFC 4291 | RFC 4291 (deprecated) | RFC 3056 |
| Still Relevant Today? | Yes | No | Rarely |
Common Mistakes When Mapping IPv4 to IPv6 Manually
Even experienced network administrators trip up on a few recurring issues:
- Forgetting leading zeros:
- Each hex group in IPv6 should represent a full 16 bits. Dropping leading zeros (f instead of 00f) is valid in compressed notation but causes errors if done inconsistently in manual calculations.
- Using :: more than once: The double-colon zero-compression shorthand can only appear once in a valid IPv6 address, since its position must be unambiguous.
- Confusing IPv4-mapped with IPv4-compatible formats: They look similar but serve different purposes, and the IETF now deprecates the compatible format.
- Skipping the binary step: Jumping straight from decimal to hex without the binary intermediate step is where most manual calculation errors creep in, especially with non-round numbers like 137 or 219.
Quick-Reference: Manual Conversion Workflow
- Take the IPv4 address (like 203.0.113.5)
- Convert each octet to 8-bit binary
- Convert binary to hexadecimal (2 hex digits per octet)
- Combine into two 16-bit groups
- Prepend the appropriate prefix (::ffff: for mapped, 2002: for 6to4)
- Apply IPv6 zero-compression rules where valid
- Verify the result against an IPv6 address validator if precision matters for production use
Frequently Asked Questions
Can every IPv4 address be turned into a valid IPv6 address?
Yes, but only through mapping or embedding methods like those above not through a mathematical conversion formula, since the two protocols use fundamentally different address spaces.
Is manual conversion still relevant when tools exist?
Understanding the manual process matters for network troubleshooting, certification exams like CompTIA Network+ or CCNA, and situations where automated tools aren’t available or trusted.
What’s the difference between IPv4-mapped and 6to4 addresses?
IPv4-mapped addresses represent an IPv4 address for software running on a dual-stack system. 6to4 addresses are designed for routing IPv6 traffic across an IPv4-only network infrastructure.
Does NAT64 use manual conversion?
NAT64 automates the IPv4-mapped IPv6 address process described in Method 1, but understanding the manual steps helps when debugging translation issues.
Related links
Final Thoughts
“Converting” IPv4 to IPv6 manually really means mapping one address space into the structure of another, using well-defined, standardized rules rather than a universal formula. Once you understand the binary-to-hexadecimal pipeline and the three core mapping mechanisms IPv4-mapped, IPv4-compatible, and 6to4 the process becomes a repeatable skill rather than a memorized trick. Whether you’re studying for a networking certification or debugging a dual-stack environment, these manual steps give you the underlying logic that automated tools rely on.
Author Profile

-
Muhammad Kazim Ali – Owner & Principal Engineer at SubnetLab.com (real-world networking labs).
10+ years in routing, switching & infrastructure design. Helps students, pros & enterprises master networking via practical labs. Based in Lahore, works with ISPs, data centers & tech teams.
📞 +92 343 5201037 (WhatsApp) | ✉️ subnetlab.official@gmail.com | 🌐 subnetlab.com