

What you’ll learn in this guide: What subnetting is and why every network engineer needs it; how subnet masks and CIDR notation actually work; and exactly how to subnet any IPv4 network in 8 clear steps, with a fully worked real-world example.
Subnetting has a reputation for being hard. If you’ve sat in a networking class, opened a textbook, or searched YouTube only to end up more confused than when you started, you’re not alone. Most explanations jump straight into binary math before you even understand why any of it matters.
This guide takes a different approach. We’re going to build up from the basics, one step at a time, until the whole picture makes sense.
Table of Contents
- What is subnetting—and why does it matter?
- Step 1 — Understand the structure of an IP address
- Step 2 — Know your IP address classes
- Step 3 — Understand subnet masks
- Step 4 — Learn CIDR notation
- Step 5 — Decide how many subnets you need
- Step 6 — Calculate usable hosts per subnet
- Step 7 — Find network and broadcast addresses
- Step 8 — Full real-world worked example
- Common mistakes and how to avoid them
- Subnetting cheat sheet
- Frequently asked questions
What Is Subnetting And Why Does It Matter?
At its core, subnetting is the process of dividing a single IP network into smaller, more manageable sections called subnets. Instead of having every device on your network crammed into one giant address space, you carve it up into logical segments, each one isolated, organized, and purpose-built.
Think of it like an apartment building. The building has one address on the street, but inside there are dozens of separate units, each with its own front door, its own space, and its own set of residents. The building is your network. The apartments are your subnets.
In the early days of the internet, networks were flat; every device lived in the same space. As networks grew, they became unmanageable. Subnetting was the solution, and it remains one of the most essential skills in networking today.
What subnetting actually gives you
- Security isolation servers, IP cameras, and sensitive devices can be placed in their own subnet, completely separated from the rest of the office.
- Reduced broadcast traffic: broadcast messages reach only devices on the same subnet, not the entire network.
- Efficient IP address use: Instead of giving a team of 8 people a block of 254 addresses, you assign exactly the right amount.
- Simpler troubleshooting: When you can say “the problem is in the Finance subnet,” diagnosing issues becomes far faster.
One network → four organized subnets
Network block: 192.168.1.0/24 (256 total addresses)
- 168.1.0/26 → Sales team (62 usable hosts)
- 168.1.64/26 → IT department (62 usable hosts)
- 168.1.128/26 → Server room (62 usable hosts)
- 168.1.192/26 → Guest Wi-Fi (62 usable hosts)
That single /24 block, neatly sliced into four isolated segments, each serving a different purpose, each keeping its traffic to itself. That’s subnetting doing exactly what it was designed to do.
Step 1 of 8: Understand the Structure of an IP Address
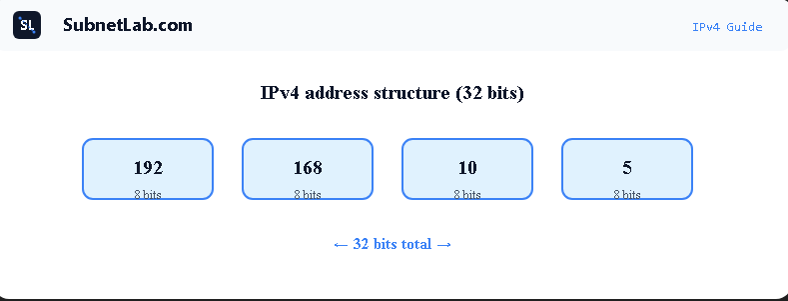
Before subnetting makes any sense, you need to be comfortable with how an IPv4 address is built. An IPv4 address is a 32-bit number — but rather than writing it as one long string of ones and zeroes, we split it into four groups of eight bits each, separated by dots. These groups are called octets.
Example: 192 . 168 . 10 . 5
Each group is 8 bits. Total = 32 bits.
Each octet can hold a value from 0 to 255, which means the total possible range of IPv4 addresses runs from 0.0.0.0 to 255.255.255.255. That’s approximately 4.3 billion addresses — a number that sounds enormous until you realize that every phone, laptop, smart TV, and router needs one.
Here’s what matters most for subnetting: every IP address is secretly two things in one. It has a network portion, which identifies the network the device belongs to, and a host portion, which identifies the specific device. Subnetting is the art of controlling exactly where that boundary sits.
The core idea: An IP address is like a full mailing address — the network portion is the street name, and the host portion is the house number. Change where you draw the line between them, and you change how many streets (networks) and houses (hosts) you get.
Step 2 of 8: Know Your IP Address Classes
Long before CIDR notation existed, IP addresses were grouped into classes and predefined categories that determined the default size of the network portion and the host portion. While classful networking has largely been replaced by CIDR, understanding IP classes is still essential. You’ll encounter them in exams, in legacy documentation, and whenever you need to quickly read an IP address and know what type of network it belongs to.
IP Address Classes Table
| Class | Address range | Default subnet mask | Max usable hosts | Typical use |
| Class A | 1.0.0.0 – 126.255.255.255 | 255.0.0.0 | 16,777,214 | Large enterprises, ISPs |
| Class B | 128.0.0.0 – 191.255.255.255 | 255.255.0.0 | 65,534 | Universities, government agencies |
| Class C | 192.0.0.0 – 223.255.255.255 | 255.255.255.0 | 254 | Small businesses, home networks |
| Class D | 224.0.0.0 – 239.255.255.255 | N/A (multicast) | N/A | Multicast streaming |
| Class E | 240.0.0.0 – 255.255.255.255 | N/A (reserved) | N/A | Experimental, not in use |
Beginner’s tip: When you’re learning subnetting, work exclusively with Class C networks the 192.168.x.x range. They’re the smallest, the most common in real offices and home labs, and the math is straightforward. Once Class C feels natural, Classes B and A become easy extensions.
Note: The 127. x.x.x block is reserved as the loopback range that’s why it doesn’t appear as Class A. When any device pings 127.0.0.1, it’s sending traffic to itself. It never leaves the machine.
Step 3 of 8: Understand Subnet Masks
The subnet mask is the mechanism that tells devices and routers exactly where the network portion of an IP address ends and the host portion begins. It’s also a 32-bit number, and it works as a kind of overlay on top of the IP address.
The rule is simple: wherever the subnet mask has a 1 bit, that position in the IP address is part of the network. Wherever it has a 0 bit, that position belongs to the host.
Seeing it in binary
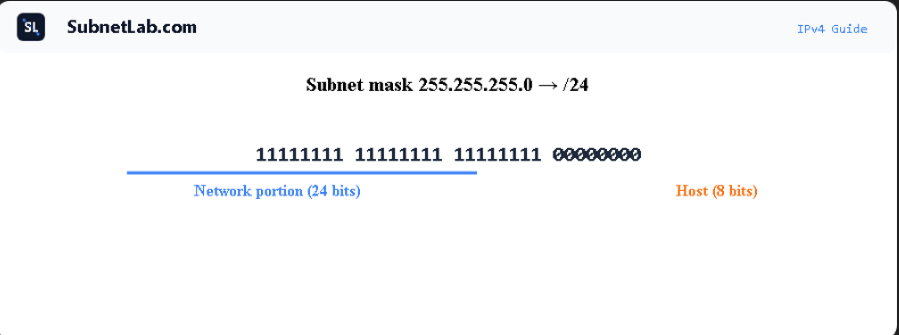
IP Address: 192.168.1.0 → Binary: 11000000.10101000.00000001.00000000
Subnet Mask: 255.255.255.0 → Binary: 11111111.11111111.11111111.00000000
Network portion = first 24 bits; host portion = last 8 bits.
In this example, the first 24 bits are the network portion — they identify the network — and the remaining 8 bits are the host portion, which identifies individual devices. Eight host bits give you 2^8 = 256 total addresses, and 254 of those are usable (more on that in Step 6).
Common subnet masks at a glance
| Subnet mask | Network bits | Host bits | Max usable hosts |
| 255.0.0.0 | 8 | 24 | 16,777,214 |
| 255.255.0.0 | 16 | 16 | 65,534 |
| 255.255.255.0 | 24 | 8 | 254 |
| 255.255.255.128 | 25 | 7 | 126 |
| 255.255.255.192 | 26 | 6 | 62 |
| 255.255.255.224 | 27 | 5 | 30 |
| 255.255.255.240 | 28 | 4 | 14 |
The trade-off to understand: As the subnet mask grows (more 1 bits), you get more subnets but fewer hosts per subnet. As it shrinks, you get fewer subnets but more hosts per subnet. Every subnetting decision is a balance between these two.
Step 4 of 8: Learn CIDR Notation — The /24 Explained
Writing out 255.255.255.0 every single time is tedious. That’s why the networking world adopted CIDR notation (Classless Inter-Domain Routing) as clean, compact shorthand.
Instead of writing the full subnet mask, CIDR simply counts the number of consecutive 1 bits in the mask and appends that number to the IP address after a forward slash.
Examples:
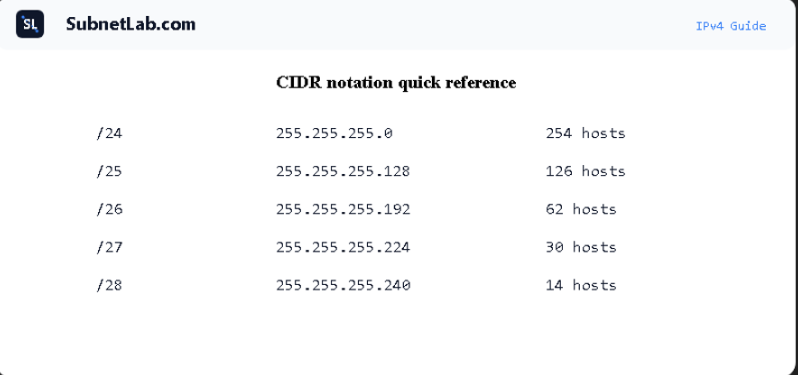
- 255.255.0 → 24 ones → /24
- 255.255.128 → 25 ones → /25
- 255.255.192 → 26 ones → /26
- 255.255.224 → 27 ones → /27
- 255.255.240 → 28 ones → /28
So when you see 192.168.1.0/24, you can immediately read it as “The 192.168.1.0 network, with 24 bits dedicated to the network portion” equivalent to a subnet mask of 255.255.255.0, supporting up to 254 devices.
Where you’ll see CIDR notation: AWS VPC configuration, Azure virtual networks, Google Cloud subnets, Linux network interfaces, Cisco router configs, firewall rules, and every modern routing table. Learning to read CIDR fluently is one of the highest-value skills in networking.
Quick rule of thumb: The higher the number after the slash, the smaller the subnet. A /30 has just 2 usable addresses. A /16 has over 65,000. A/24—the most common gives you 254.
Step 5 of 8: Decide How Many Subnets You Need
This is where subnetting becomes a design exercise, not just a math exercise. Before you touch a calculator, you need to answer one question: how many subnets does this network actually need?
Creating subnets means borrowing bits from the host portion of the address and reassigning them as subnet bits. Every bit you borrow doubles the number of subnets available — but it also halves the number of hosts each subnet can hold. That trade-off is at the heart of every subnetting decision.
Formula: Number of subnets = 2^n (where n = number of bits borrowed from the host portion)
Example (starting from a /24 network):
| Bits borrowed | Subnets created | Starting prefix | New prefix |
| 1 bit | 2 subnets | /24 | /25 |
| 2 bits | 4 subnets | /24 | /26 |
| 3 bits | 8 subnets | /24 | /27 |
| 4 bits | 16 subnets | /24 | /28 |
| 5 bits | 32 subnets | /24 | /29 |
Growth plan, not just today: If you need 4 subnets right now, design for 8. Reorganizing a live network because you ran out of subnets is a painful, disruptive process and entirely avoidable with a little forward thinking at design time.
Step 6 of 8: Calculate the Number of Usable Hosts Per Subnet
Once you know your subnet size, calculating how many devices can actually live in each subnet is straightforward. You only need one formula:
Usable hosts = 2^h − 2 (where h = number of remaining host bits)
The minus 2 accounts for two addresses that are always reserved in every subnet—no exceptions:
- Network address: the very first address in the subnet (all host bits set to 0). It identifies the subnet itself, not any device on it.
- Broadcast address: the very last address in the subnet (all host bits set to 1). Sending to this address reaches every device on the subnet simultaneously.
Neither can be assigned to a router, computer, printer, or any other device. Every subnet loses exactly these two addresses — always.
Usable hosts by subnet size starting from a /24
| Prefix | Subnet mask | Host bits | Usable hosts | Block size |
| /25 | 255.255.255.128 | 7 | 126 | 128 |
| /26 | 255.255.255.192 | 6 | 62 | 64 |
| /27 | 255.255.255.224 | 5 | 30 | 32 |
| /28 | 255.255.255.240 | 4 | 14 | 16 |
| /29 | 255.255.255.248 | 3 | 6 | 8 |
| /30 | 255.255.255.252 | 2 | 2 | 4 |
Real-world note on /30: A subnet with only 2 usable hosts sounds useless, but it’s actually ideal for point-to-point links between two routers. Exactly two devices, zero wasted addresses. You’ll see /30 all over enterprise and ISP networks for this reason.
Step 7 of 8: Find the Network Address, Broadcast Address, and Host Range
With your subnet size and mask established, finding the exact address ranges for each subnet comes down to one elegant shortcut: the block size.
How to calculate the block size
Block size = 256 − (value of the last relevant octet in the subnet mask)
For a subnet mask of 255.255.255.192, the block size is 256 − 192 = 64. That means each subnet occupies exactly 64 addresses, and subnets start at multiples of 64: 0, 64, 128, 192.
The address layout inside every subnet
- Network address—the starting address of the block (host bits = all 0s). Cannot be assigned to a device.
- First usable host—network address + 1
- Last usable host—broadcast address − 1
- Broadcast address—the final address of the block (host bits = all 1s). Cannot be assigned to a device.
Example: Subnet mask 255.255.255.192 (/26) — block size: 64
Subnet 1:
- 168.1.0 → Network address [reserved]
- 168.1.1 → First usable host
- 168.1.62 → Last usable host
- 168.1.63 → Broadcast address [reserved]
2:
- 168.1.64 → Network address [reserved]
- 168.1.65 → First usable host
- 168.1.126 → Last usable host
- 168.1.127 → Broadcast address [reserved]
3: 192.168.1.128 → Network address, etc.
The pattern to notice: Each subnet begins exactly where the previous one ends, plus one. The block size makes this mechanical — once you know it, listing every subnet in a network is just simple addition, repeated.
Step 8 of 8: A Full Real-World Example Worked From Start to Finish
Theory is useful. Practice is what makes it stick. Let’s take a real scenario and work through the complete subnetting process from scratch.
The scenario
You’re the network administrator for a small business. Your assigned IP block is 192.168.10.0/24. Management wants the network divided into four separate segments — one each for Sales, IT, Finance, and Guest Wi-Fi.
Step-by-step solution
- How many subnets do we need?
We need 2^n ≥ 4, which means n = 2 bits borrowed. New prefix: /24 + 2 = /26. - What is the new subnet mask?
A /26 prefix corresponds to 255.255.192.0. - What is the block size?
256 − 192 = 64. Each subnet contains 64 total addresses. - How many usable hosts per subnet?
2^6 − 2 = 62 usable hostsper subnet. - Map out all four subnets:
| Subnet | Network address | Usable host range | Broadcast | Assigned to |
| 1 | 192.168.10.0/26 | 192.168.10.1 – 192.168.10.62 | 192.168.10.63 | Sales |
| 2 | 192.168.10.64/26 | 192.168.10.65 – 192.168.10.126 | 192.168.10.127 | IT |
| 3 | 192.168.10.128/26 | 192.168.10.129 – 192.168.10.190 | 192.168.10.191 | Finance |
| 4 | 192.168.10.192/26 | 192.168.10.193 – 192.168.10.254 | 192.168.10.255 | Guest Wi-Fi |
Visual representation:
192.168.10.0/24 divided into 4 × /26 subnets
- .0/26 → Sales, 62 hosts
- .64/26 → IT, 62 hosts
- .128/26 → Finance, 62 hosts
- .192/26 → Guest Wi-Fi, 62 hosts
Total usable addresses: 248 | Subnets: 4 | Wasted: 0
Verify your work instantly: Enter 192.168.10.0 with prefix /26 into the SubnetLab IPv4 Subnet Calculator (https://subnetlab.com/) and it will show you the network address, broadcast address, host range, and block size — all calculated automatically.
Common Mistakes And How to Avoid Them
Even experienced engineers make subnetting errors when they’re working quickly. These are the mistakes that come up most often, and the habits that prevent them.
Best practices to build from day one
- Document every subnet—keep a simple record of which subnet is assigned to which team or device group. This saves enormous time during troubleshooting.
- Use CIDR notation consistently—it’s less error-prone than writing out full subnet masks, and it’s what every modern system expects.
- Design for 2× your current needs— if you need 4 subnets, design for 8. Networks grow. Rebuilding your addressing scheme on a live network is far more painful than over-provisioning at the start.
- Learn the block size shortcut—once it’s second nature, you can list every subnet in a network using nothing more than simple addition.
Mistakes that catch beginners off guard
- Forgetting the minus 2—the network and broadcast addresses are reserved in every subnet. Always subtract 2 from your total address count to get usable hosts.
- Confusing subnet masks with wildcard masks—a subnet mask (255.255.255.0) and a wildcard mask (0.0.0.255) are exact inverses. Wildcard masks appear in Cisco ACLs and OSPF configurations — don’t mix them up.
- Assigning the broadcast address to a device—it looks like a normal IP, but doing so causes network errors that can be difficult to diagnose.
- Starting calculations before planning—always determine how many subnets and hosts you need before picking up a calculator. Starting from the requirements keeps the math purposeful.
Wildcard mask reminder: The wildcard mask is simply the bitwise inverse of the subnet mask. For 255.255.255.192, the wildcard mask is 0.0.0.63. You’ll need this when configuring Cisco router ACLs and OSPF areas—it’s worth understanding why they’re related, not just memorizing the values.
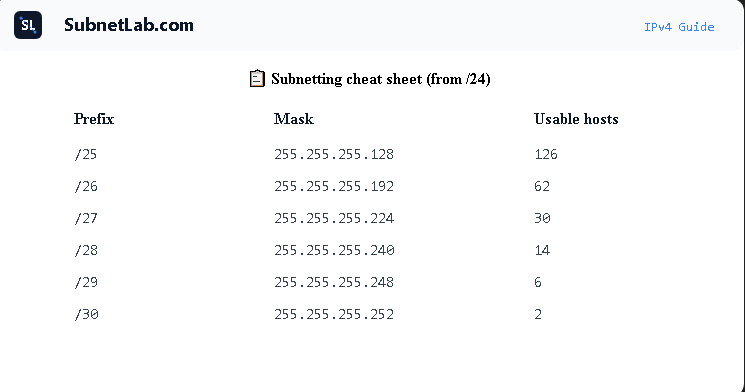
Subnetting Quick Reference — Save This
This table covers every common subnet size you’ll encounter in practice.
| Prefix | Subnet mask | Subnets (from /24) | Usable hosts | Block size |
| /24 | 255.255.255.0 | 1 | 254 | 256 |
| /25 | 255.255.255.128 | 2 | 126 | 128 |
| /26 | 255.255.255.192 | 4 | 62 | 64 |
| /27 | 255.255.255.224 | 8 | 30 | 32 |
| /28 | 255.255.255.240 | 16 | 14 | 16 |
| /29 | 255.255.255.248 | 32 | 6 | 8 |
| /30 | 255.255.255.252 | 64 | 2 | 4 |
Frequently Asked Questions
What is the best way to learn subnetting as a beginner?
Work through examples by hand, then verify your results with a subnet calculator. Start with a simple /24 network, practice splitting it into 2, 4, and 8 subnets, and build up from there. The formula becomes intuitive faster than most people expect—usually within a few hours of focused practice.
What does /24 mean in an IP address?
The /24 is CIDR notation, indicating that the first 24 bits of the address represent the network portion. It is equivalent to a subnet mask of 255.255.255.0, and it provides 254 usable host addresses within a single network.
Why do we always subtract 2 from the number of hosts?
Because two addresses in every subnet are permanently reserved: the network address (first address, identifies the subnet) and the broadcast address (last address, used to reach all devices simultaneously). Neither can be assigned to a device. This rule applies to every subnet, without exception.
What is the difference between a subnet mask and a wildcard mask?
They are exact mathematical opposites. A subnet mask uses 1s to identify network bits — for example, 255.255.255.0. A wildcard mask uses 1s to identify host bits — for example, 0.0.0.255. Subnet masks appear in IP configuration; wildcard masks appear in Cisco router ACLs and OSPF routing protocol configuration.
Can I do subnetting without binary math?
Yes. Once you know the block size formula (256 minus the last octet of the subnet mask) and have the common CIDR prefix values memorized, you can solve most subnetting problems using only basic arithmetic. Many working network engineers rely on exactly this shortcut in their day-to-day work.
What is VLSM and how is it different from regular subnetting?
Variable Length Subnet Masking (VLSM) allows different subnets within the same network block to have different sizes. Standard subnetting divides a network into equal-sized pieces; VLSM lets you assign a /25 to a large department, a /29 to a small server cluster, and a /30 to a router link — all from the same parent block. It eliminates wasted addresses. Use the SubnetLab VLSM Calculator (https://subnetlab.com/vlsm-calculator/) to plan and visualize VLSM designs.
Practice what you just learned
Use SubnetLab’s free IPv4 Subnet Calculator to check your subnetting work in seconds — no account needed.
Open the Subnet Calculator → https://subnetlab.com/
Related Tools and Guides on SubnetLab
- VLSM Calculator — Variable Length Subnet Masking (https://subnetlab.com/vlsm-calculator/)
- Wildcard Mask Calculator (https://subnetlab.com/wildcard-mask-calculator/)
- IPv6 Subnet Calculator (https://subnetlab.com/ipv6-subnet-calculator/)
- CIDR to IP Range Converter (https://subnetlab.com/cidr-to-ip-range-convertor/)
- IP Range to CIDR Converter (https://subnetlab.com/ip-range-to-cidr-convertor/)
Written by the SubnetLab Team
SubnetLab.com provides free networking tools and practical guides for IT students, network engineers, and anyone studying for the CCNA or CompTIA Network+ certification.